| PathEngine home | previous: | next: |
'Anchors' refers to PathEngine's content side position representation.
This representation is designed to enable positions on a ground surface to be
represented in a way that is less sensitive with respect to changes in the underlying ground surface
than PathEngine's run-time position representation.
Refer to this page (in the Content Creators Guide),
for a general explanation about this feature.
Anchors are represented within Maya with 'open linear curves', (i.e. open nurbs curves with degree 1), with either one or two segments (so 2 or 3 vertices).
The first segment defines the horizontal position and vertical range of the anchor.
The horizontal position and z start are taken from the first vertex.
Z end is taken from the second vertex.
For clarity, the horizontal position of the second vertex should be set identical to the first vertex,
although this is not checked.
If you don't care about anchor orientation then a one segment curve can be used
(and in this case anchor orientation will be set to zero).
If anchor orientation needs to be specified, then a 2 segment curve can be used,
with the direction of the second segment defining the orientation.
Use the EP curve tool to create an anchor.

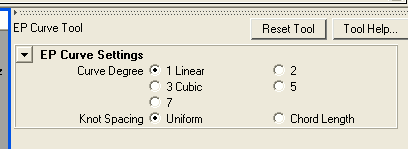
This tool needs to be set to create a linear curve.
You can access the settings for the tool by double-clicking on the tool icon.

Now click either two points (if orientation is not required),
or three points (if orientation is required), in a viewport (and then press 'enter' to finish shape creation).
The easiest way to get the points in the right place is to just click anywhere initially,
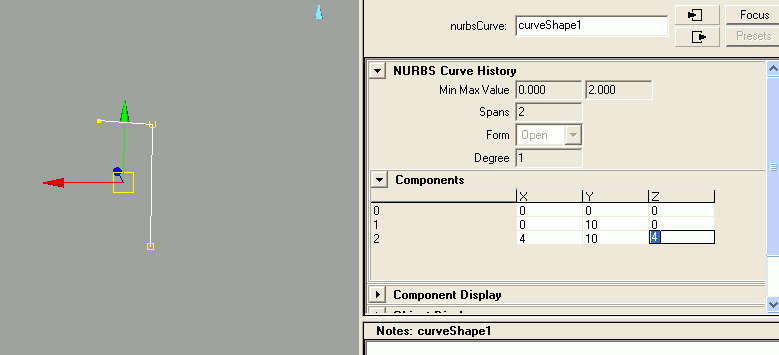
and then go back and type in coordinates manually with the attribute editor.
To do this, set the selection mode to 'Select by component type' and the component type to points,
and select all the points on the curve you just created.
You should now be able to see these components under 'Components' in the attribute editor,
for the curve shape you have just created.

The easiest way to place further anchors is to copy an existing anchor and move and scale as appropriate.
An alternative to creating an anchor manually is to import a mesh containing an anchor or a pinned shape.
Anchors must be assigned names with either an 'anchor_' or 'terrainAnchor_' prefix.
(Specifically, the relevant name here is the name of object transform node.)
Objects without this name prefix will be ignored on export.
Anchors with the 'anchor_' prefix are standard anchors, which will be resolved by intersection of the anchor vertical range with the ground mesh.
Anchors with the 'terrainAnchor_' prefix are terrain anchors, which will be resolved to faces assigned with section ID = 0 (by convention the first 'terrain layer').
Anchors with a '_' just after the prefix (e.g. an anchor named 'anchor__24', with a double underscore)
are treated as anonymous anchors.
These anchors can be used to pin shapes to a mesh, but are not then themselves stored with the mesh.
Otherwise the anchor will be stored with the mesh with an ID taken from the object name after the anchor prefix.
Anchor IDs must be unique.
| Documentation for PathEngine release 6.04 - Copyright © 2002-2024 PathEngine | next: |